
Also, scroll down to see a brief how-to on that tufted cookie.


First, draw a guide on the cookie using a ruler and an edible ink marker.
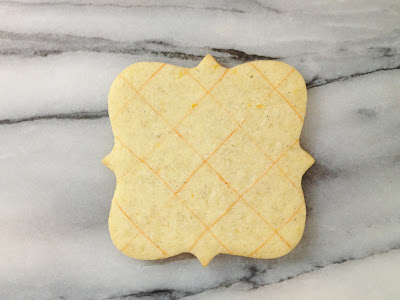
 Fill in the squares in between, but don't yet fill in squares that will be touching each other. Let these dry for about an hour.

A brief how-to on the tufted cookie:
First, draw a guide on the cookie using a ruler and an edible ink marker.
Then, fill in the squares using 10 count royal icing and a tip 2. Let the the icing dry for about 10 minutes.
Fill in the squares in between, but don't yet fill in squares that will be touching each other. Let these dry for about an hour. Fill in the rest of the squares.
 Visit
Visit
Gorgeous cookies as always!! :D
ReplyDeleteThanks for the tutorial Amber, can't wait to try it out.
ReplyDeleteMay 2012 be a Happy, Healthy and Prosper one for you Amber! I love the cookies they are beautiful!
ReplyDeletethanks for the breakdown on how to do this technique. your cookies look fantastic!
ReplyDeletethanks for the breakdown on how to do this technique! your cookies look fantastic!
ReplyDeleteGorgeous, Amber! The cookies are so elegant.
ReplyDeleteAmber, these are so precious...I love the color scheme, and the textures. I don't have that one cutter, and I can see that I'm going to have to get it. I love the shape and especially the quilted look...this grouping is already one of my favs. Thanks for sharing.
ReplyDeleteThanks everyone!! I'm so glad you like them!
ReplyDeleteI soo love this technique!!! You're super creative and it shows in all your delectables!!
ReplyDeleteThank you Gigi!
ReplyDeleteAll the best for 2012!
ReplyDeletei have a question... They always taught me to pipe an outline and fill it with ten second run out icing. But it seems you don't do that. Do you just use 10 s icing without outlining?
Btw, it's time for you to write a book on cookies. I would certainly buy it!
Looking forward to your answer!
Maaike (from Mjammie.etsy.com)
Hi Maaike! I make an outline with the 10 second icing and fill it in immediately so that the outline blends in and is undetectable. I'll get to work on my book! ;) Thank you for your comment!
ReplyDeleteSo clever! Thanks for sharing the "how to" :)
ReplyDeleteLove them! I just 'pinned' them. My first 'Pin' actually!! Great attention to detail.
ReplyDeleteThat's great Milenna! Thank you!
ReplyDeleteI have this same cutter, but my cookies don't look like yours:) WOW! Thanks for all the wonderful ideas. I love the quilting and the stitching~beautiful set!
ReplyDeleteThank you Sue!
ReplyDeleteThese are my absolute fave!! They are beyond gorgeous & amazingly creative! I would have never thought to have done that design on them! =)
ReplyDeleteYour cookies are the most gorgeous I have ever seen! I do have one question on the valentine cookies. How do you make the gold icing like on the little hearts? That's not painted is it??
ReplyDeleteThank you Dawn! I painted the gold onto the icing after it was dry
ReplyDeleteI ordered this lovely plaque cutter because of your beautiful cookies!! When I receive it, I will try your tufting method. Would you please tell me how you made those adorable heart-shaped "buttons"? Thank you!
ReplyDeleteThat's great, Kathy! The heart was made using a mold that I made from a button. I pressed the fondant into the mold and then shaped it into a heart once I removed it.
ReplyDeleteWow! These are just breath taking! How did you do the fish scale one with the brushed embroidery? Is that a stencil you used? Unbelieveable! LOVE! :)
ReplyDeleteI could look and look all day long at this set and it's still like the first time! Jut in case you don't already know, you're amazing!
ReplyDeleteHaha thank you Callye!
ReplyDeleteAbsolutely gorgeous - I thought they were embossed fondant until I saw your tutorial, thanks for sharing.
ReplyDeleteAwesome! Thank you so much for the quilting tutorial! I can't wait to try it!
ReplyDelete